

Wandering Wall Creeper
Work in progress
When I begin a new project, I rarely have a complete plan for how I am going to stitch it. I most often start with no more than a vague idea, or gut feeling, of what I hope to achieve and how I would like the finished piece to look.
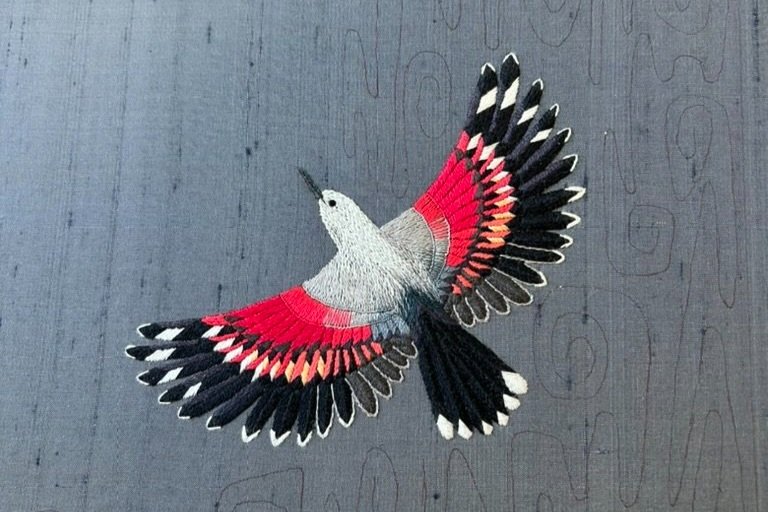
It was no different with the piece I am working on now: The WANDERING WALL CREEPER. I knew it was going to be embroidered with silk threads on silk fabric, with the addition of some silver metal thread embroidery. I also knew from the beginning that I wanted to stitch this pair of birds using a variety of surface stitches instead of embroidering them in silk shading - but that was as far as the plan went.
I have embroidered a number of birds, and when I do, I try to think about how the feathers on a live bird overlap and stitch in that same order. With that in mind, the tail usually comes first.

The Tail
I don’t know about you, but I seem to go through phases of favourite stitches and at the moment, I am using a lot of fishbone stitch. When I recently stitched the Major Mitchell cockatoo, I discovered just how fabulous this stitch is to embroider feathers, so it was an easy choice to use fishbone stitch for the tail feathers.

Next up: Wings
Again, starting at the back to get the correct overlap of the rows of feathers. The first row is the long, slender feathers. The fishbone stitch had worked so well for the tail, I decided to use it again for the solid coloured feathers, adding lighter split stitch outlines first. I left the outlines exposed to create a light coloured edge on the feathers.

To be able to use different colours for the various sections of each feather, I embroidered the largest feathers towards the tip of the wing in satin stitch.
I also used satin stitch for the second row of feathers. Introducing the vibrant coral reds amongst all the grey and white was so exciting. - By the way, would you believe that there is not a single black thread in this piece?

More satin stitch for the next row of scarlet feathers. I have always loved how the reflection of light adds another dimension to silk embroidery and brings various surfaces to life.
As the size of the feathers grew progressively smaller, I had to adjust my choice of stitch to fit, so I was able to achieve the appropriate colour variations across the wing. I embroidered the upper row of feathers using another favourite stitch of mine: Close blanket stitch. I love this stitch. It gives me the smooth surface of satin stitch with the added bonus of a firm purl edge on one side - perfect for overlapping feathers.

Finally, the upper section of the wing. I had to give in and use a bit of long & short stitch, after first having worked along the edge in blanket stitch to get the nice edge.
Up until now, I embroidered both wings at the same time. Because I wanted to somehow blend the upper section of the left wing into the body, I left that for later.

Head & Body
It can often be tricky to merge one section of stitches into another.
After initially thinking I might have to also embroider the bird’s body in long & short stitch, I remembered how lovely close rows of stem stitch work as a filling stitch. It ends up looking almost like woven cloth. So that is what I did. Stitching back and forth, I could gradually merge the rows of stem stitch into the top of the tail. I could now also finish the left wing and merge the stem stitch into the long & short stitch across the top.
If you wonder what the green cloth is, it is a ‘Chucks’ cleaning wipe. I use them to cover my work, especially silk embroidery, while I stitch. They are great because they don’t fray, and by cutting a cross in the middle of a cloth, I can fold back the corners so only the part of the embroidery I am working on is exposed.

I have really enjoyed using a variety of stitches to create the different feather textures, and I am happy with how my first wall creeper has turned out. The second bird is smaller, and while I ponder if the same use of stitches on a smaller scale is going to work, I move to something completely different:
The mountainside. How would you stitch a mountainside?
I don’t want it to be heavy, grey and overpowering - even if that is what rocky mountain sides are, so I am going to embroider the impression of a rocky mountain side in silver. It is well underway, and although I have a busy weekend ahead, I hope to finish it.
Wish me luck.
Best Stitches,
Anna x